Collaborative guides are edited by the general community based on a general focus and are works of opinion. Please use the Discussion page or the Discord if major changes are required.
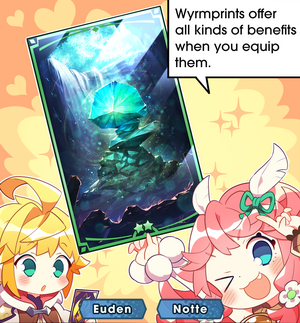
Adventurer's Guide 04: Wyrmprints?
Wyrmprints are card-like pieces of equipment that can grant additional abilities and stats when equipped.
Basics
Wyrmprint Basics[ | ]
Overview[ | ]
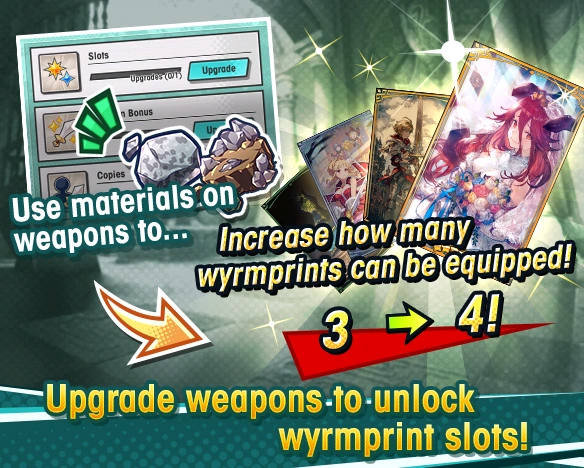
Each adventurer is able to equip up to 5 wyrmprints, depending on the slots for their weapon. These slots are divided between gold and blue slots, with gold only taking 5 wyrmprints and blue only taking 3 or 4 wyrmprints.
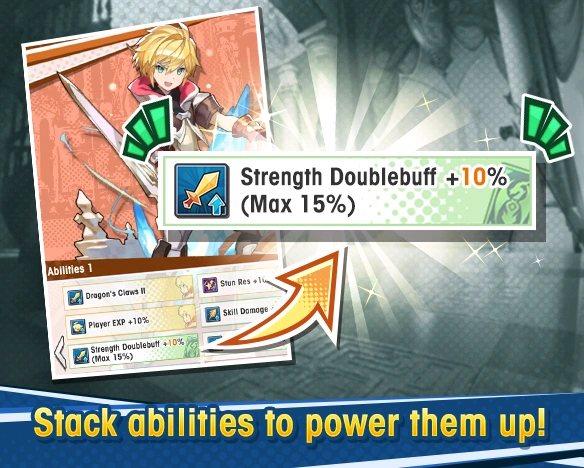
For wyrmprints that boost the same stat, there is a "max" value across your print loadout that cannot be exceeded. For example, equipping a 20% skill damage print and a 30% skill damage print will not sum to 50% damage, but instead be capped at the max value of 40% skill damage.
The abilities of a wyrmprint, as well as its appearance, can be enhanced when it is unbound 2 times in the upgrade menu. The abilities will be enhanced again at the maximum of 4 unbinds.
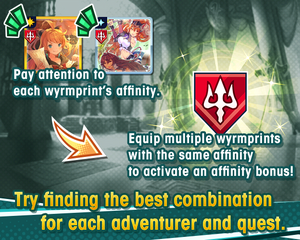
Some wyrmprints have access to an Affinity, which will grant additional abilities if enough prints of that Affinity are in the adventurer's loadout. Affinity bonuses are not subject to the usual wyrmprint stat caps mentioned above.
How do I get Wyrmprints?[ | ]
Wyrmprints tend to be available in 3 ways:
1. Exchanging Eldwater in the Shop - This is the primary method that you will use to get Wyrmprints. Every print except for limited ones will be available to purchase in the shop, in exchange for Eldwater. Cost varies depending on a Wyrmprint's Rarity, as listed below.
Rarity
Cost
5
4,000
4
2,000
3
200
2. Event Rewards - Events will often give out Wyrmprints as endeavor rewards, and several of these prints are only obtainable during their event specifically. The quality of these prints can vary widely, but they're relatively easy to get, and are cheap to upgrade.
3. Quest Drops - Wyrmprints released in April 2019 or earlier will rarely appear as drops in some quests. However, the drop rate is very low, so it is not worth waiting for these drops to happen. Any prints released after April 2019 will not appear as drops at all.
Also, please note that duplicate drops of wyrmprints you already have, will be automatically converted into Eldwater instead. So farming for drops won't let you cheap out on extra copies, unfortunately.
Wyrmprints are equipped into the slots on your current weapon. These slots are split between Gold slots (for 5 prints) and Blue slots (for 4 /3 prints). The amount and type of slots available will vary by your weapon, and you may need to unlock a slot with materials. The Weapon Crafting article has some more details.
Weapon Rarity
2
✔
✔
3
✔
✔
4
✔
✔
✔
5 (non-elemental)
✔
✔
✔
✔
5 (elemental)
✔
✔
Unlockable
✔
✔
6
✔
✔
Unlockable
✔
✔
Stacking Effects[ | ]
Stacking Effects
Equipping multiple wyrmprints that grant you the same stat will cause them to stack together, up to that effect's cap. The caps don't care about how you got the effect, they only care about limiting the final effect you gained. For example, equipping Levin's Champion (70% HP = 10% Crit Rate) and Dueling Dancers (15 combo = 10% Crit Rate) will stack up to the Crit Rate maximum of 15%, instead of going to 20%.
Generally, you want to avoid overcapping a specific stat, as that ends up wasting a slot you could have used on a different stat.
Some wyrmprints will have an Affinity, which will grant you a bonus ability if you equip enough of the same-Affinity prints. For example, equipping 2 prints with Lance Affinity will grant a bonus +5% Force Strike Damage. The Affinity Bonuses article has more details.
Generally speaking, Affinity Bonuses are only worth getting if the required prints are useful in their own right. If you can get a Bonus, great, but if not, don't break your build for it. Especially don't equip a bunch of bad prints just to get an Affinity Bonus - it's usually not worth the trouble.
How do I upgrade Wyrmprints?[ | ]
You can upgrade prints in the upgrade menu, similar place as your weapons. There are 4 ways to upgrade your prints:
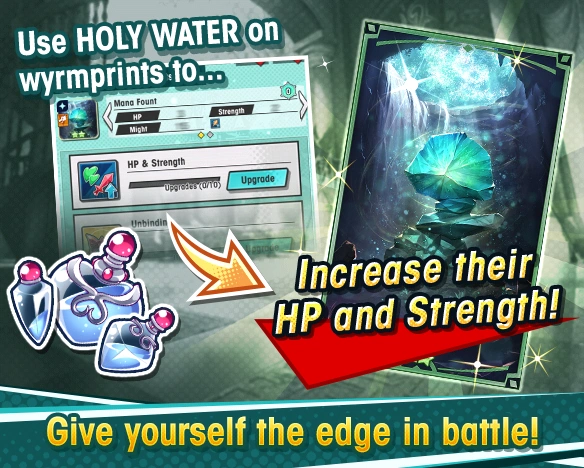
Upgrading HP & Strength
1. HP & Strength - As the name might imply, upgrading HP & Strength increases the stats of a wyrmprint.
There is a maximum amount of upgrades allowed, depending on the rarity of a wyrmprint and the amount of unbinds it currently has:
Unbinds
2
3
4
5
0 unbinds
6
12
20
30
1 unbind
7
14
25
35
2 unbinds
8
16
30
40
3 unbinds
9
18
35
45
4 unbinds
10
20
40
50
Upgrading a wyrmprint costs Holy/Blessed/Consecrated Waters, with the type and amount needed per level varying by the wyrmprint's rarity.
2
3
4
5
x7
x7 x2
x3 x3
x3 x5
These waters are generally not easily farmable, so you'll depend on event rewards to get them. This coupled with wyrmprints' stats not being very crucial anyway, means you shouldn't worry about this upgrade path until you approach the endgame.
Unbinding
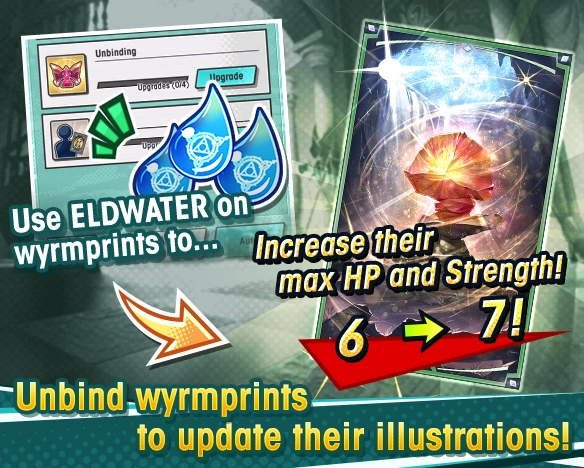
2. Unbinding - This is the most important upgrade path, as getting to 2 and 4 (max) unbinds will upgrade the wyrmprint's ability. The ability is pretty much the whole reason you'd want a print at all. Upgrading this costs Eldwater, with the costs varying by rarity and unbind count as follows:
Rarity
1st unbind
2nd unbind
3rd unbind
4th unbind
5
6,000
9,000
9,000
9,000
4
3,000
4,000
4,000
4,000
3
300
400
400
400
2
10
10
10
10
5 Welfare
300
400
400
400
4 Welfare
150
200
200
200
3 Welfare
30
40
40
40
You can also use Silver Keys (for 4 ) or Golden Keys (for 5 ) to unbind your wyrmprints, at a cost of 1 key per unbind. Since the first unbind on a print is cheaper than the remaining unbinds, it's recommended to use keys on unbinds 2 - 4 to get the most value.
3. Copies - This allows you to equip the same print on multiple adventurers in a team, and any upgrades you make to the print will be cloned among these copies. Getting more copies costs Eldwater, but the catch is that you need a lot of Eldwater - usually enough to max unbind a print, just to buy one extra copy. Therefore, you should only consider additional copies after you have finished unbinds on a print. And even then, only get copies if you absolutely need them.
Rarity
Copy cost
5
37,000
4
17,000
3
1,700
2
10
5 Welfare
1,700
4 Welfare
850
3 Welfare
170
4. Augments - These items allow you to add some extra HP and Strength to your wyrmprints. These stat boosts are significant at the endgame, where every stat point counts - but before that point, they don't matter much. You can find more details as well as drop locations at the main Augments article
1. Summoning - Summoning a duplicate Adventurer will give you some Eldwater instead, depending on their rarity:
Adventurer Rarity
Eldwater Gained
5
x8,500
4
x2,200
3
x150
2. Selling Dragons - you can sell unwanted Dragons by going to Teams -> Collection -> Dragons -> Part Ways. You'll get more Eldwater for selling higher-rarity dragons, however you should be careful not to sell something you actually need.
3 dragons can be safely sold in most cases, as they are outclassed by 4 options. However, keep at least one of every dragon for building bonds in the Dragon's Roost.
Dragons obtained for free from events (colloquially called "Welfare" dragons) will have lower sell values than usual.
Sell values by rarity are listed below for 0UB dragons.
If a dragon is unbound, the amount of unbinds will be factored into the sale value (e.g. selling a 3UB 5 dragon will have the same value as selling 4 copies of a 5 dragon.)
Dragon Rarity
Rupies + Eldwater Gained
5
x5,000 + x8,500
4
x2,000 + x2,200
3
x300 + x150
5 Welfare
x5,000 + x300
4 Welfare
x2,000 + x100
3 Welfare
x300 + x10
The Mercurial Gauntlet
3. The Mercurial Gauntlet (monthly) - This is a mode where you can fight a stationary boss to test your damage output. You'll get a monthly payout of Eldwater among other things, with the amount increasing depending on how many Mercurial Gauntlet floors you have cleared. Also, you only need to clear each floor once, you don't need to repeat the process each month. The amount of Eldwater you get is hefty, ranging from about 30,000 for early-game players to over 90,000 at the high end. Try to pop into this mode whenever you get stronger, so you can improve your Eldwater income.
Main Capaign - Hard Mode
4. Main Campaign - Hard Mode - Completely clearing a chapter of the Main Campaign on Hard Mode will reward you with some Eldwater. Note that you can only get this once per chapter.
Hard Chapter Cleared
Eldwater Gained
Chapters 1 - 6
x1,500 (each)
Chapters 7 - 10
x5,000 (each)
Chapters 11 - 16
x10,000 (each)
5. Events - Events, both limited-time ones and the permanent Event Compendium ones, tend to give varying amounts of Eldwater as well.
Getting Started
Getting Started[ | ]
Using this Guide[ | ]
The information in this guide is intended to be used at either an introductory or mid-game level, to teach you generally what's good to use. End-game builds will sometimes consider things like Dragon, Co-Abilities, Chain Co-Abilities, and Shared Skills equipped on the character, but builds in this guide will usually not account for those. However, they will account for factors such as affliction punishers where applicable.
This guide will also assume that you have all 5 Wyrmprint slots unlocked on your weapon, for maximum build flexibility.
This guide is not going to list builds for every single unit in the game, as a lot of them come down to the following steps:
Step 1: - Look at the Unit-Specific Builds tab. These units have unusual builds, and if your unit is there, you're done! If not, move to step 2.
Step 2: - Look at the Role-specific Builds tab and check if your unit fits one of the builds listed. If they do, great! (Move to step 4 to fill out any Flex slots you have left.) If your unit didn't match a role, go to step 3.
Step 3: - Look at the Weapon-Specific Builds tab and find the one that fits your unit's weapon type and affliction. (You may have some "Flex" slots left over. To fill those, go to step 4.)
Step 4: - Look at the Flex Options tab and pick some prints to fill your remaining Flex slots.
Note that some of the prints listed are limited, as in they were only available during specific limited-time events. These prints will be marked by an hourglass:
Blue for prints tied to events or holidays that may get a rerun (such as Halloween)
Red for prints tied to collab events or specific anniversary years, that will likely never return.
Non-limited alternatives will be suggested whenever possible, but some limited prints may be too unique to be replaced.
Which Wyrmprints should I buy first?[ | ]
The general strategy with Wyrmprint builds on dps units is to follow the following priority:
Starter Build (Leader Unit) - This build is fairly cheap and covers your bread-and-butter for DPS: Skill Damage, Strength, and Crit Rate. We've skipped over affliction punisher for now, for the sake of making this build general-purpose.
Note that the intent is that you put this on your leader unit, which you control. The strength and crit prints here require combo to activate their effects - while a human player probably won't have issues with that, the AI isn't quite so good at keeping combo.
See the step-by-step list below to get yourself set up.
When starting out, it is generally more important to build a varied collection of prints rather than max-unbinding (mub-ing) only a few. Having a mub dagger print won't really help your sword units, for example. Try to hold off max-unbinding until your collection has grown. The following steps can help guide you through this process:
First, you'll want a Skill Damage print, and the cheapest option is to go pick up Plunder Pals. To do this, go into the Event Compendium in your Quest menu, open up "Trick or Treasure!", kill the Pumpking boss 2 times, and claim Plunder Pals from your endeavor rewards.
Go into the Upgrade menu and max unbind Plunder Pals + unlock all 4 copies. This should run you a total of about 6,600 Eldwater, which is dirt cheap for 4x max-unbound 5 prints. Stick these on all DPS units in your team.
Now we want to outfit your player-controlled unit. For this, we want Memory of a Friend and Dueling Dancers from the Shop. These will cover your Strength and Critical Rate needs. Buy both, but don't worry about unbinding them yet. This should cost you another 6,000 Eldwater.
Flash of Genius can also substitute for Memory of a Friend - they're almost identical, Flash of Genius just has 3 less strength.
Go back into the Event Compendium and start up "The Miracle of Dragonyule". Follow similar steps to what you did for Plunder Pals, to pick up A Slice of Dragonyule. Max unbind it, but don't buy extra copies. This will cost about 1,500 Eldwater. We will give this to our AI units in the next step.
For your AI units, we'll buy an assortment of other prints that will become useful later. For the most part, don't worry about unbinding them yet. Each print will cost 2,000 Eldwater, for a total of 10,000 Eldwater for this step.
Distribute 2 prints to each AI unit, making sure to pair Slice of Dragonyule with Rogues' Banquet on the same unit.
Now, slowly start to buy 0ub copies of Role-Specific and Weapon-Specific prints, particularly the Skill Damage ones. The Role-Specific Builds and Weapon-Specific Builds tabs have some recommended options. This can be a long process, so take your time.
Steadily start to max-unbind your Role-Specific and Weapon-Specific setups, prioritizing the roles and weapons you play most.
Look into Flex Options to optimize builds depending on your unit. By this point you've already got good base prints, so it's a matter of min-maxing.
Role-Specific Builds
Role-Specific Builds[ | ]
These builds concern specific Roles, which can apply across several different weapon types, and are too general to be listed in Unit-Specific Builds.
Buffers[ | ]
Buffers can be identified as units who buff the team's stats on their skill 1. Their personal DPS tends to be rather low, so they want to focus on supporting the team rather than their own DPS. Examples of buffers include: Emma, Elisanne, Tobias, Chitose, Patia.
Note that Buff Time does NOT affect Buff Zones, such as those from Eugene, Nevin, or Gala Prince. You may need to build such units like a normal DPS instead.
Pick Dragon's Nest for near-max skill haste with Dragon Prep mixed in. (24% Skill Haste + 20/25% Buff Time + 10% Dragon Prep) Preferable for Raid Battles due to Dragon Prep applying to all 4 parties.
Pick From Whence He Comes to trade some Skill Haste for Buff Time. (20% Skill Haste + 30% Buff Time)
Bow's Boon focus (4 buff time for Flame / Light / Shadow) - This variant of the Bow Boon focus build uses an element-locked 4 buff time print instead of a 5 one. Note that this means not all elements are eligible for this build. (20% Skill Haste + 25% Buff Time)
If you put Buff Time (such as Proper Maintenance) in the 5 Flex slot, then this build is effectively the same as the From Whence He Comes choice in the Bow Boon focus build. (20% Skill Haste + 30% Buff Time)
If you put a Bow Boon print (such as Auspex's Prayer) in the 5 Flex slot, then this build becomes comparable to the above Enchiridion build. (24% Skill Haste + 25% Buff Time)
Staff's Boon Focus (max/near-max Buff Time) - This set of builds focuses more on Staff's Boon for additional Buff Time. (8/9/10% Skill Haste + 45% Buff Time)
If you want Force Charge (such as from Castle Cheer Corps), you can trade off one 5 Staff's Boon print to fit it in. (8/9/10% Skill Haste + 38% Buff Time)
If you want to add a second Skill Haste print (to get the haste to 15%), you can trade off one 5 Staff's Boon print to fit it in. (15% Skill Haste, 38% Buff Time)
If you want both Force Charge and a second Skill Haste print, trade off two 5 Staff's Boon prints. (15% skill haste, 35% buff time)
Staff's Boon Focus - Healers are fortunate in that they can easily achieve max buff time through Staff's Boon without straying from their usual print priorities. (45% Buff Time)
Warrior Maiden can work in place of Give Me Your Wounded - it just has 4 less HP.
The flexible slot has several options depending on the situation:
Castle Cheer Corps provides emergency on-demand skill charging, if heals are needed at a critical moment.
Free-Spirited Opera allows your standard attacks to debuff enemy strength, which decreases the damage taken by the team, and overall makes your healing job easier.
Overdamage (Buff Time + Strength) - This variant of the Staff's Boon build is specifically for healers that provide the Overdamage buff. This buff uses the strength of the healer at the time of casting, but the damage mods of the buff receiver. Therefore, these healers want to maximize their buff time as well as strength. Flurry strength is chosen since Overdamage effectively doubles your combo count, making it easy to maintain combo for flurry. (45% Buff Time + 20% Strength)
If you're still not convinced about maintaining combo, an HP-based strength print such as Crystalian Envoy is fine, but will have less strength. (45% Buff Time + 13% Strength)
If you're able to maintain Full HP consistently, or are using this on a Helper, you can consider a Full HP = Strength print such as Evening of Luxury. (45% Buff Time + 15% Strength)
Dragon Spam! - This set best fits units that can spam dragon transformations and/or want to stay in dragon form, such as The Prince, Gala Mym, Gala Prince, or Lathna. Simply slot in your 40% Skill Damage print (if your weapon has one) over Plunder Pals and you're good to go.
With all 4 pieces, Dragon's Boon will grant a Dragon Damage boost of +30%, whereas with 3 pieces your boost will be +18%, and with 2 pieces will be +10%.
If you want to run a 5 affliction punisher, remove An Ancient Oath or The Red Impulse, according to whether your unit prefers more Skill Damage or more Strength.
If you want to run a 4 affliction punisher, remove Entwined Flames, since this build is stacking Dragon Damage so much already.
If the team has a defense buffer, you can consider running Sisters of the Anvil over Entwined Flames, while still keeping your dragon affinity.
Please note that this build does NOT work on Dragondrive units such as Bellina or Tiki.
Dragon Battle Z - This build is specifically geared for Dragon Battles in Onslaught Events, where you'll be in dragon form for the entirety of the quest. Once again, replace Plunder Pals with a 40% skill damage print, if your weapon type has one.
A key difference here is that we can only transform once, so An Ancient Oath and The Red Impulse lose a lot of value. Pecorine's Grand Adventure grants us more strength than AAO could with just the one transform. But if you don't have PGA, then AAO should still work fine.
Mana Fount ensures that you hit 40% skill damage, just in case your adventurer doesn't have access to a 40% skill damage print. It also has dragon affinity, of course.
Prayers Unto Him works identically to The Bridal Dragon. Pick whichever artwork you prefer.
If you want to run a 5 affliction punisher, remove The Bridal Dragon and put your affliction punisher there. You should also remove Mana Fount and replace it with Entwined Flames, to get back some of TBD's dragon damage.
If you want to run a 4 affliction punisher, remove Mana Fount, as you might have a 40% skill damage print equipped already.
Please note that this build does NOT work on Dragondrive units such as Tiki.
Helper Damage + Utility - This build seeks to maximize damage from Helper skills, making use of the quirk that Helpers are always considered to be at Full HP.
If your weapon type has access to a 40% Skill Damage print, that can work in place of Witch's Kitchen.
Evening of Luxury can work in place of Endless Waltz - they are completely identical, even down to stats.
If your weapon type has access to a 4 Critical Rate print, that can work in place of Flower in the Fray.
If your weapon type has access to a 5 Critical Rate print, you can drop Flower in the Fray for a 4 Flex slot.
Dragon's Nest is here to offer Dragon Prep, which will affect the team of whoever is using your helper.
The last Flex slot can go toward capping your Strength or Critical Rate for the set.
Weapon-Specific Builds
Weapon-Specific DPS Builds[ | ]
These builds are for general purposes depending on weapon type and affliction access. They should work at a basic level for most DPS units, but make sure to check the Unit-Specific Builds tab in case your unit has unique qualities.
Sword Build (4 affliction punisher) - Swords highly favor using force strikes in their combos - 2 to 3 taps followed by FS is a staple strategy for optimal DPS.
To capitalize on this, we're using a 5 force strike print in Here Come the Sealers!. It also comes with the Lance Affinity, which grants an extra +5% force strike damage when two Lance Affinity prints are present. Lucky for us, Memory of a Friend also has Lance Affinity, so we can easily combine the two for the bonus.
The Lurker in the Woods or Nightstalker can substitute for Sealers (Lurker has identical stats, while Nightstalker has 3 less strength), while Flash of Genius can substitute for Memory of a Friend (though it has 3 less strength).
The rest of the build is straightforward, using Dueling Dancers to grant crit and our other 4 slot to grant affliction punisher.
If you aren't confident in your ability to maintain combo (and/or if you are putting this build on an AI-controlled teammate), you can use an HP 70% = Strength print such as Crystalian Envoy in place of Memory of a Friend, and a crit rate print such as One with the Shadows in place of Dueling Dancers.
Sword Build (5 affliction punisher) - This time we have an affliction punisher taking up our third 5 slot, so we'll have to use a 4 slot for our force strike print. The Warrioresses provides a little less force strike damage than the 5 options, but it still has Lance Affinity, so we can maintain the +5% FS bonus.
Lunar Festivities can substitute for The Warrioresses - it has 1 less strength.
Flame units should run To the Extreme! instead of Dueling Dancers to get a bit more crit rate.
If you aren't confident in your ability to maintain combo (and/or if you are putting this build on an AI-controlled teammate), you can use an HP 70% = Strength print such as Crystalian Envoy in place of Memory of a Friend, and a crit rate print such as One with the Shadows in place of Dueling Dancers.
If you go this route, Light units can get 1% extra crit by running Kicking Back instead of One with the Shadows.
Blade Build (4 affliction punisher) - Blades lack a 40% skill damage print, so we'll have to settle for 30%. Several options for it exist, but we're listing Plunder Pals since it's the cheapest, and you most likely already have it from earlier in the guide.
Water units have the option to put The Prince of Dragonyule in their third 5 slot, in which case they should drop Dueling Dancers to get a Flex 4 slot instead.
If you don't think you can maintain combo, then Levin's Champion can work instead.
If you aren't confident in your ability to maintain combo (and/or if you are putting this build on an AI-controlled teammate), you can use an HP 70% = Strength print such as Crystalian Envoy in place of Memory of a Friend, and a crit rate print such as One with the Shadows in place of Dueling Dancers.
Blade Build (5 affliction punisher) - This time our affliction punisher is taking a 5 slot, granting us a Flex 4 slot instead.
Flame units should run To the Extreme! instead of Dueling Dancers to get a bit more crit rate.
If you aren't confident in your ability to maintain combo (and/or if you are putting this build on an AI-controlled teammate), you can use an HP 70% = Strength print such as Crystalian Envoy in place of Memory of a Friend, and a crit rate print such as One with the Shadows in place of Dueling Dancers.
If you go this route, Light units can get 1% extra crit by running Kicking Back instead of One with the Shadows.
Dagger Build (4 affliction punisher) - Daggers have access to two weapon-specific prints: Twinfold Bonds in 5 for skill damage, and A Passion for Produce in 4 for crit rate.
Water units have the option to put The Prince of Dragonyule in their third 5 slot, in which case they should drop A Passion for Produce to get a Flex 4 slot instead. However, note that you will have the same amount of crit rate either way - which setup you use will depend on what Flex print you want to equip.
If you aren't confident in your ability to maintain combo (and/or if you are putting this build on an AI-controlled teammate), you can use an HP 70% = Strength print such as Crystalian Envoy in place of Memory of a Friend.
Dagger Build (5 affliction punisher) - This time our affliction punisher is taking a 5 slot, granting us a Flex 4 slot instead.
If you aren't confident in your ability to maintain combo (and/or if you are putting this build on an AI-controlled teammate), you can use an HP 70% = Strength print such as Crystalian Envoy in place of Memory of a Friend.
Axe Build (4 affliction punisher) - Axes have access to two weapon-specific prints: Summer Paladyns for skill damage and Kung Fu Masters for crit rate, both in 5 .
Axes have fairly slow swings, so maintaining combo for a Flurry Strength effect may be difficult. Due to this, we're running Crystalian Envoy as it has 70% HP = 13% strength (some substitutes exist, but most of them are limited).
Our last 4 slot can be another strength print such Beautiful Nothingness to round out the strength at 20% again - or you can run a different effect entirely.
Axe Build (5 affliction punisher, no flurry) - This time our affliction print is a 5 , but that makes our 5 options quite crowded. Due to this, we're moving our strength print down to 4 , but the most strength we can manage in one slot is 10%.
Our last 4 slot can be another strength print such Beauty's Secret to round out the strength at 20% again - or you can run a different effect entirely.
Lance Build (4 affliction punisher) - Fairly straightforward build, utilizing the 40% skill damage print for Lances, Dragon and Tamer.
Water units have the option to put The Prince of Dragonyule in their third 5 slot, in which case they should drop Dueling Dancers to get a Flex 4 slot instead.
If you don't think you can maintain combo, then Levin's Champion can work instead.
If you aren't confident in your ability to maintain combo (and/or if you are putting this build on an AI-controlled teammate), you can use an HP 70% = Strength print such as Crystalian Envoy in place of Memory of a Friend, and a crit rate print such as One with the Shadows in place of Dueling Dancers.
Lance Build (5 affliction punisher) - This time our affliction punisher is taking a 5 slot, granting us a Flex 4 slot instead.
Flame units should run To the Extreme! instead of Dueling Dancers to get a bit more crit rate.
If you aren't confident in your ability to maintain combo (and/or if you are putting this build on an AI-controlled teammate), you can use an HP 70% = Strength print such as Crystalian Envoy in place of Memory of a Friend, and a crit rate print such as One with the Shadows in place of Dueling Dancers.
If you go this route, Light units can get 1% extra crit by running Kicking Back instead of One with the Shadows.
Bow Build (4 affliction punisher) - Bows have access to two weapon-specific prints: Forest Bonds for skill damage and Dear Diary for crit rate, both in 5 .
If you aren't confident in your ability to maintain combo (and/or if you are putting this build on an AI-controlled teammate), you can use an HP 70% = Strength print such as Crystalian Envoy in place of Memory of a Friend.
Bow Build (5 affliction punisher, no flurry) - This time our affliction print is a 5 , but that makes our 5 options quite crowded. Due to this, we're moving our strength print down to 4 , but the most strength we can manage in one slot is 10%. The last slot can go to another strength print such as Beauty's Secret to round out the strength at 20%, or can go to a different print entirely.
Bow Build (5 affliction punisher, flurry) - This build drops Dear Diary for a Flurry Strength print, opening up a 4 Flex slot at the loss of 2% or 4% crit.
Flame units should run To the Extreme! instead of Dueling Dancers to get a bit more crit rate.
Wand Build (4 affliction punisher) - Fairly straightforward build, utilizing the 40% skill damage print for Wands, Candy Couriers.
Water units have the option to put The Prince of Dragonyule in their third 5 slot, in which case they should drop Dueling Dancers to get a Flex 4 slot instead.
If you don't think you can maintain combo, then Levin's Champion can work instead.
If you aren't confident in your ability to maintain combo (and/or if you are putting this build on an AI-controlled teammate), you can use an HP 70% = Strength print such as Crystalian Envoy in place of Memory of a Friend, and a crit rate print such as One with the Shadows in place of Dueling Dancers.
Wand Build (5 affliction punisher) - This time our affliction punisher is taking a 5 slot, granting us a Flex 4 slot instead.
Flame units should run To the Extreme! instead of Dueling Dancers to get a bit more crit rate.
If you aren't confident in your ability to maintain combo (and/or if you are putting this build on an AI-controlled teammate), you can use an HP 70% = Strength print such as Crystalian Envoy in place of Memory of a Friend, and a crit rate print such as One with the Shadows in place of Dueling Dancers.
If you go this route, Light units can get 1% extra crit by running Kicking Back instead of One with the Shadows.
Manacaster Build (4 affliction punisher) - Manacasters lack a 40% skill damage print, so we'll have to settle for 30%. Several options for it exist, but we're listing Plunder Pals since it's the cheapest, and you most likely already have it from earlier in the guide. Manacasters do have access to a 12% critical rate print in Enter the Blue Rose! though, so we'll be using that.
Water units have the option to put The Prince of Dragonyule in their third 5 slot, in which case they should drop Enter the Blue Rose! to get a Flex 4 slot instead. However, note that you will have the same amount of crit rate either way - which setup you use will depend on what Flex print you want to equip.
If you aren't confident in your ability to maintain combo (and/or if you are putting this build on an AI-controlled teammate), you can use an HP 70% = Strength print such as Crystalian Envoy in place of Memory of a Friend.
Manacaster Build (5 affliction punisher) - This time our affliction punisher is taking a 5 slot, granting us a Flex 4 slot instead.
If you aren't confident in your ability to maintain combo (and/or if you are putting this build on an AI-controlled teammate), you can use an HP 70% = Strength print such as Crystalian Envoy in place of Memory of a Friend.
Flex Options
Flexible Options[ | ]
These prints can be slotted into builds on multiple different weapon types, but may be dependent on specific content and strategies.
Strength - These wyrmprints grant additional Strength, which is the basis of pretty much all damage coming out of an adventurer, and hence directly increase DPS. They can be especially effective if your adventurer is equipped with a Skill Damage dragon, which tend to have little to no innate Strength.
Flash of Genius and Memory of a Friend grant the maximum possible Strength boost of +20%, but they require a combo count of 15 or higher to be active. Combo Time Extension abilities and/or chain co-abilities can help with maintaining combo, especially on units that would otherwise drop combo naturally, such as Hunter Sarisse, or on AI teammates.
The listed wyrmprints also have access to the Lance Affinity, which can potentially grant additional Force Strike damage. While that isn't always relevant, it places these 2 prints above other flurry strength options that lack an Affinity.
These wyrmprints are not as suitable for use in the Mercurial Gauntlet if you plan to use a helper and are playing an adventurer that builds up combo slowly, such as Axes, as the use of a helper skill resets the combo counter to 0.
Crystalian Envoy, Beautiful Nothingness, and Beauty's Secret grant lesser amounts of Strength (+13% and +10% respectively), but they only require your current HP to be at least 70% of your maximum HP.
Bonds Between Worlds, Wily Warriors: Bubble & Wood, and Pecorine's Grand Adventure are effectively the same as Crystalian Envoy, but since they're welfare, they have much lower unbind and copy costs.
Pecorine's Grand Adventure also has the Dragon Affinity, which can let it synergize well with dragon-focused builds.
Second Anniversary grants even less strength at 2%, 4%, or 8%, depending on how many team members are still alive. This can be used for units that can't maintain the 70% HP threshold, and can't maintain combo.
Strength Doublebuff - For single units or team compositions that can buff Defense fairly often, Strength Doublebuff can turn a strong defense into strong offense.
Units such as Summer Celliera or Ramona with natural Strength Doublebuff especially benefit from stacking one of these prints on top of it.
This effect is especially valuable for units whose skills scale in power according to buff count - for example, Karina or Xander.
If you have another slot available, pairing strength doublebuff prints with Buff Time (such as on From Whence He Comes) can make the effect last longer and potentially stack more.
Sisters of the Anvil also has the Dragon Affinity, which can let it synergize well with dragon-focused builds.
Critical Rate - These wyrmprints grant additional Critical Rate, which can help supplement the increase in Strength to increase DPS, and also scale with Critical Damage abilities. In addition to the overall increase in DPS, lucky critical hits against a boss during break can significantly help with clearing quests faster.
Elemental Flurry Devastation prints such as The Prince of Dragonyule and To the Extreme! provide critical rates that are almost as good as weapon-specific Critical Rate prints of equivalent rarity, but they require a combo count of 15 or higher to be active. Combo Time Extension abilities and/or chain co-abilities can help with maintaining combo, especially on units that would otherwise drop combo naturally, or on AI teammates.
Dueling Dancers works as a general Flurry Devastation option, providing a high boost for its rarity. It also has the Dragon Affinity, which can let it synergize well with dragon-focused builds.
Levin's Champion provides a lesser amount of critical rate boost, but only requires your current HP being at least 70% of the maximum.
Best Buds and One with the Shadows provide unconditional, but smaller boosts.
Kicking Back provides slightly more than One with the Shadows, but is elementally locked to Light.
Note that Critical Rate Up's onset of diminishing returns show up sooner than Strength Up, especially if there are already pre-existing Critical Rate Up abilities, and lack of Critical Damage Up abilities.
Critical Damage - Critical Damage by itself doesn't do much without the critical rate to back it up (most adventurers start with a critical rate of just 2%, with Axes starting at 4%). But if given Critical Rate Up abilities, or on adventurers that can reliably achieve high or guaranteed criticals (either by maxing out the critical rate as with Ezelith and Ilia, or by being Inspired), Critical Damage Up abilities can further elevate your DPS.
Seaside Princess and Chariot Drift are unconditional Critical Damage Up prints that work anywhere.
Moonlight Party requires your current HP to be at least 70% of your maximum HP to function for a bigger boost.
Wily Warriors: Metal & Quick is effectively the same as Moonlight Party, but since it's welfare, it has much lower unbind and copy costs.
Gauge Accelerator - A Mother's Love allows for breaking the boss's Overdrive bar faster by making all damage towards it multiplied further by the Gauge Accelerator bonus, which tends to lead to earlier breaks, possibly faster clears, and more DPS overall. Swords, as well as adventurers that have spammable, enhanced force strikes such as Hunter Sarisse in particular enjoy these types of prints, since their Force Strike is great for chunking down Overdrive bars. Pair with Force Strike and Overdrive Punisher prints such as Here Come the Sealers! and Lord of the Skies for even better results.
They're also great for quests where breaking the boss speedily is important, such as the majority of current raid bosses and The Mercurial Gauntlet, either due to the short time limit, or when affliction punisher is unavailable or undesired.
Overdrive Punisher - Lord of the Skies increases damage towards bosses in overdrive, which tends to lead to earlier breaks, possibly faster clears, and more DPS overall. It even works if your plan wasn't to break in the first place - as long as the boss is in Overdrive for a vast majority of the fight (regardless of whether they break), then this print will still improve your damage output during that time.
Swords, as well as adventurers that have spammable, enhanced force strikes such as Hunter Sarisse in particular enjoy these types of prints, since their Force Strike is great for chunking down Overdrive bars. Pair with Force Strike and Gauge Accelerator prints such as Here Come the Sealers! and A Mother's Love for even better results.
They're also great for quests where breaking the boss speedily is important, such as the The Mercurial Gauntlet, either due to the short time limit, or when affliction punisher is unavailable or undesired.
Note that the Overdrive Punisher effect on the print is somewhat weak, the Overdrive Punisher raid boost itself is likely enough for most raids, and you'll be adding to a rather saturated punisher bracket anyway.
Force Strike - For units that focus heavily on using force strikes for damage, mainly Swords and the Monster Hunter units, boosting the power of those force strikes can lead to faster Overdrive breaks and overall improved DPS. If skill damage isn't a concern but breaking Overdrive quickly is needed, for example in Void Agni Strike, then a Gauge Accelerator print can be run alongside an FS print for even faster breaking speed.
Units such as Yachiyo and Delphi with enhanced Force Strikes from skill effects also benefit from running Force Strike prints, even if their goal isn't to break Overdrive.
Broken Punisher - While break state tends to last for only a short amount of time, it is also a prime opportunity for adventurers to unload extremely large amounts of damage. These Broken Punisher prints multiply damage against broken bosses, and as they use their own unique bracket in calculating damage, can have an extremely strong effect for adventurers that have their skills or dragon form ready to whale on a boss.
An Indelible Date is a welfare print, meaning it's very cheap to unbind and copy. It also has mostly the same effect as Worthy Rivals, though it lacks an affinity. But at time of writing, the affinity on Worthy Rivals isn't particularly useful anyway.
Skill Haste - Skill Haste is a tricky subject. The goal is to hit a "breakpoint", i.e. an amount of haste where you can shave off 1 or more attacks toward charging a skill. Breakpoints are different for every character, but a good rule of thumb is to look for breakpoints of 8-10% or lower.
Building onto that, combining two Skill Haste prints, with at least one of them being elementally specific, can maximize the Skill Haste at 15%.
Wily Warriors: Flash & Heat can max the Skill Haste at 15% without need of a specific element, when paired with Jewels of the Sun. However, it's limited to the Mega Man collaboration, and it might not return.
Alternatively, United by One Vision could also max the skill haste. However, its United Haste ability will weaken if adventurers in your team (your own team only, if a raid) fall for good.
Jewels of the Sun and Seaside Memory both have access to the Bow Affinity, so combining them with a third Bow Affinity print such as Castle Cheer Corps will active the Affinity bonus for even more Skill Haste.
Skill Prep and Force Charge - For certain units or quests, it can be very important to get skills ready as soon as possible.
This can be used for offense, for example during Void Battle epithet speed clears, or speeding up auto-battling of standard difficulty Advanced Dragon Trials.
This can also be used for defense, such as lessening Advanced Dragon Trial or Master difficulty Agito opening blasts with instant buffs (example users: Gala Elisanne, Grace, Halloween Lowen).
A Slice of Dragonyule is king among Skill Prep +50% prints since its event welfare status makes it significantly cheaper than other choices to obtain unbinds and copies of.
An alternate approach is to use Force Charge, provided by Castle Cheer Corps or Sisters' Day Out, which can instantly fill skill gauges by 25% from a Force Strike, 3 times per quest, for a total of 75% skill prep.
Combining the above points, Castle Cheer Corps with a 50% prep print can serve as a pseudo-100% skill prep once 2 Force Charges are used up, also leaving 1 additional Force Charge in case it's required.
Note that Force Charge is activated per hit; some weapons may have it difficult or impossible to avoid using more Force Charges than necessary.
Castle Cheer Corps has access to the Bow Affinity, which can make it better than Sisters' Day Out if that Affinity's bonus gets activated. If not, they're interchangeable.
Some units have built-in skill prep that doesn't quite reach 100%. Notably, Halloween Lowen, Nurse Aeleen, Lowen (without Mana Spiral), and Cleo (without Mana Spiral) all max out at 75%. These units' skill prep can be "completed" by pairing with a 50% skill prep print.
Similarly, pairing any two Skill Prep +50% prints will enable any adventurer to achieve 100% Skill Prep, regardless of existing abilities.
Fair warning: if you are going to run Skill Prep, you should make absolutely sure you actually reach 100%. If you are not reaching 100% prep, you're probably wasting your time. 50% Prep really isn't doing much for you alone. You want skills as soon as possible, so don't leave the job half-done.
Healing Doublebuff - In quests that emphasize surviving over DPS, or when solo-playing endgame content, Healing Doublebuff can turn def buffs into healing sources for a hyper-defensive strategy.
If combined with Strength Doublebuff prints such as Brothers in Arms or Sisters of the Anvil, a hybrid DPS/survival strategy can emerge. This is sometimes used in Omega Raid battles to help the team live, while still providing more DPS than running a dedicated healer.
Strength -10 & Strength Debilitator - This effect offers an interesting trade-off: lower your own strength in order to debuff enemies' strength. It's best used on healers or other supportive units, whose own strength is usually not very important anyway. Debuffing enemies' strength also means that teammates will take less damage, which means an easier job for the healer.
For auto play, where survival is key, this effect can also help to make runs more consistent.
Resilient Offense - For units that thrive at low HP (often called "enmity" units), and have a consistent method of lowering their own HP, Resilient Offense can offer an extra 10% strength for the remainder of the quest the first time the unit's health drops to 30%.
It is possible to stack Resilient Offense up to 3 times during a quest, meaning it is theoretically possible to get 30% after triggering 3 procs. However, doing so requires some form of healing to get back above the threshold, and low HP units would rather never get healed at all. Therefore, setting up more than 1 stack during a quest is usually not feasible.
Due to the above point, Resilient Offense should not be considered a straight-up replacement for Flurry Strength on enmity units. Instead, it should be considered a supplement in addition to Flurry Strength (since they don't share a cap), or should be used if Flurry Strength is impossible to use.
Slayer's Strength and Striker's Strength / Wave-clearing content - These prints can see use in wave-based content where a lot of small enemies are present, such as Facility Event Challenge Battles, Defensive Events, and Onslaught Events.
Note that Slayer's and Striker's strength are slightly different in their usage: Slayer's simply counts your kills, whereas Striker's only counts kills where the killing blow was a Force Strike. To compensate, Striker's requires fewer kills than Slayer's to activate its stacks.
The Heroes Arrive and Vio Rhyse Alberia! have Slayer's strength. Vio Rhyse Alberia also has the Dragon Affinity, which can let it synergize well with dragon-focused builds.
Summertime, Feeling Feline, Memories of Youth, and Together we Stand all have Striker's Strength. Together We Stand also has the Lance Affinity, which can combine with another print such as Here Come the Sealers! to trigger the +5% bonus force strike damage.
"Last" abilities and niche Doublebuffs / Speedruns - These prints are very niche, but with the right setup, they can be used in speedrun or "cheese" strategies to defeat a boss within seconds.
Last Offense on Tough Love, Warlust, or Hanetsuki Rally provides a massive strength boost of 40-50% when the user drops to 30% HP. However, this only works once per quest, and your blaze of glory only lasts 15 seconds. You'll need to KO the enemy within that short time, or at least very soon after, to make it worth the trouble - otherwise, your print slot is basically dead for the rest of the fight. Getting to this HP threshold can be done by tanking a powerful hit (for example: an opening blast in Advanced Dragon Trials or master Agito Uprising), and/or by playing an "enmity" unit that can simply dip their HP low by using a skill.
Last Devastation on Unexpected Requests has a similar concept to Last Offense, but it boosts critical rate by 30% instead.
Critical Damage Doublebuff on Felyne Hospitality puts an interesting spin on critical damage. Normally, you need very high critical rate to make critical damage even slightly worth considering in a build. However, speedruns will often have Inspiration on the team to guarantee a critical hit, removing the random element. Add in that doublebuffs can stack, and that team-wide defense buffs (to activate doublebuff) can be obtained through Shared Skills, and this print suddenly can turn your Inspired skill into a tactical nuke.
Furthermore, units with skills that scale in power according to buff count, such as Karina, can get even more damage from the fact these are buffs.
Energy Doublebuff on Blossoms in a New Year's Sky or Halidom Grooms similarly gives Energy an interesting use case. Energy grants +50% skill damage if you gain 5 stacks and then use a skill. The boost is good, but usually the issue is that Energy takes too long to build up in a fight. In speedruns though, we can get around that by running Energy Doublebuff alongside team defense buffs again, to beef up everyone's next skill.
Alternatively, Energy Prep on The Petal Queen can get 5 stacks of energy ready right away, though you'll be forced to use it on the first attack or heal skill that you use. But perhaps that's what you wanted to do anyway. In any case, choose your first move wisely.
Though not pictured here, speedrun prints can also be matched up with effects such as Strength Doublebuff (to make use of team defense buffs), Skill Prep (to ensure skills are ready asap, if the unit doesn't have prep already), Force Charge (to charge skills mid-fight, basically as a double skill prep), Overdrive Punisher / Gauge Accelerator (to get the boss into Break as soon as possible), or Broken Punisher (to kill the boss ASAP once they enter Break).
The best prints for a specific speedrun are highly dependent on team composition, gear, and the fight itself. Be sure to research what's best to use based on the situation - we've only scratched the surface and highlighted some of the common pieces.
Player EXP - These prints have no actual combat effect, but instead boost Player EXP gain, which can work towards Wyrmite, an expanded stamina cap, and an expanded friend list cap. One of these prints can be slapped onto a flex slot if you're facing a non-threatening piece of content. You could even put it on backline units during co-op and still get the effect, despite the backline units not entering combat.
Note that this effect does not stack across prints or adventurers. If you have a 5 The Prince (with his 15% Player EXP) and some copies of these prints on the team, then the 15% overrides everything else and you only get 15% Player EXP total.
Unit-Specific Builds
Unit-Specific Builds[ | ]
These prints don't necessarily follow the general build patterns, and are often custom-made to fit an adventurer's unique strengths.
Poisonous Prophet - Delphi's main contributions are his super-potent poison (300% damage mods when most other sources are just 60% or lower), and some debuffs on the enemy. His poison's damage is split into two parts: most of it is from his enhanced force strike, while the last bit is from his skill 2.
The poison from force strike is the big thing to focus on here. Therefore, we're running a force strike print in a 5 slot to help boost it.
Skill 2's poison isn't nearly as significant, so we're dropping skill damage altogether in favor of Force Charge from Castle Cheer Corps. This allows Delphi to set up poison quickly, giving his poison more time to do its damage ticks.
Since Delphi is still a dagger, we're running A Passion for Produce in a 4 slot for the crit rate.
The final 4 slot goes to The Plaguebringer for poison punishing. However, note that it won't apply to the poison itself until the second time Delphi applies it. The poison only checks the enemy's status at the instant before it's applied, and for that first time the enemy technically isn't poisoned yet.
Daggers usually don't have trouble keeping combo, but if you aren't convinced, then a 70% HP = strength print such as Crystalian Envoy can work in place of Memory of a Friend.
No Skill Damage, Full HP only, Flurry Devastation - Durant has no damaging skills, so running Skill Damage prints is a no-go. Instead, he revolves around staying at Full HP and buffing his own strength, crit rate, and critical damage.
While Durant does want to always be at Full HP, he stands to gain more strength and crit rate from flurry prints instead, so we're running those. His critical rate is also fairly high, so he can run a critical damage print in his final 5 slot.
Since buffing himself is core to his kit, Durant wants to run a buff time print in one of his 4 slots. If you have the limited print Luck of the Draw then that would be perfect, but if not, then From Whence He Comes is good enough.
If you don't think you can keep up combo, then a Full HP = strength print such as Evening of Luxury can work in place of Memory of a Friend, and Levin's Champion can work in place of Howling to the Heavens.
Skill Chain Assassin - Unlike most swords, Gala Alex doesn't rely very much on her force strike - she can usually get by with normal 5-tap combos. Therefore, she can run a standard Shadow DPS build without force strike prints.
The Broken Punisher on Sniper's Allure synergizes well with Alex's extreme DPS during break.
If you don't think you can keep up combo, then a 70% HP = strength print such as Crystalian Envoy can work in place of Memory of a Friend, and Levin's Champion can work in place of Howling to the Heavens.
An Otherworldly Force - Gala Zena is quite unusual for a staff, as she's primarily a DPS more than a healer, and the majority of her DPS is coming from her enhanced force strike.
Gala Zena has a passive that grants her a % strength bonus for every % HP she gets from prints and dragons, so this means that Study Rabbits is essentially an 8% strength print that's not subject to the normal 20% strength cap. It'll also boost her healing, for some icing on the cake.
Zena's unique combo string moves fast enough to maintain combo on its own, but she's likely to lose combo while charging her big force strike. This can be remedied with Combo Time from Mitsuhide or Fritz. Study Rabbits and Spirit of the Season are pretty much locked in, but her remaining print options split into two different setups depending on Combo Time's presence.
If you don't have Combo Time extenders (Here Come the Sealers + Beautiful Nothingness + Beauty's Secret) - We can't run a flurry strength print, so we'll have to make that up with HP 70 = strength prints. We'll need to use 2 slots to get back up to 20% again, so we'll do that with Beautiful Nothingness and Beauty's Secret in the 4 slots, while we put a force strike print such as Here Come the Sealers in our 5 slot.
If you have access to Combo Time extenders (Memory of a Friend + The Warrioresses + Dueling Dancers) - This means we can slot in flurry strength on the third 5 slot, maxing our strength in one swoop. Our force strike print gets moved down into 4 , but Lance's Boon softens the loss of FS damage. Our final 4 slot is free to add in some crit rate via Dueling Dancers.
Eternal Life Shields - Grace wants 3 things for her job: HP (for bulkier life shields), Healing Doublebuff (to heal herself faster and refresh life shields faster), and Skill Prep (to cast a shield immediately at the start of a fight). We can do this with four prints: Study Rabbits (HP), Odd Sparrows (Healing Doublebuff), and 2x 50% Skill Prep prints, leaving her with a Flex 5 slot.
If you'd rather have a 4 flex slot, take out Rogues' Banquet and put another 50% skill prep print (such as The Chocolatiers or Gentle Winds) into the third 5 slot.
Grace can be run in both on-element and off-element content, so an elemental resistance print can make her bulkier depending on the fight. For example: Happy New Year! for Light Res, or Glittering Dragonyule for Flame Res. Note that many of these prints are limited, though.
If you're facing a high dragon specifically, you can consider one of the high dragon resistance prints (such as Glorious Tempest) from the Imperial Onslaught treasure trade. But those prints are of questionable use otherwise.
Alternatively, Grace can take A Suit of Midnight or After an Eternity for the Affliction Guard, for extra safety against afflictions that might disrupt her from making shields (burn/paralysis may stop her from gaining HP, stun/sleep could lock her in place, etc).
A Wish Upon the Yuletree can provide Grace with a general defense boost for all content when above 70% HP. Note that she is going to be dipping her own HP a lot, so this won't always be active, but it will likely be active when she's about to make a new life shield. This means that if an enemy hits Grace during or near this critical moment, the life shield won't lose as much bulk from the hit.
I'm a Healer, but... - Despite what may be implied by being a healer, Heinwald is all about damage: more damage means more heals, and he gains a lot more from running DPS prints than healer classics like recovery potency or HP. Unfortunately, there's no 40% Skill Damage print for staffs that he can use, so he has to settle for a 30% one (Plunder Pals is listed here because it's the cheapest one, and you probably already have it). The rest of the build is a straightforward Shadow DPS setup.
If you don't think you can keep up combo, then a 70% HP = strength print such as Crystalian Envoy can work in place of Memory of a Friend, and Levin's Champion can work in place of Howling to the Heavens.
True Charge Slash - Hunter Berserker's playstyle is to use a fully-charged force strike, roll, repeat. Due to this, he highly favors force strike prints, as well as any strength he can get. However, his force strike takes long enough to charge that he is likely to drop combo without a Combo Time extender, such as from Nobunaga or Ezelith. His force strike and affliction prints are pretty much locked in, but his remaining options depend on whether he has Combo Time:
If you don't have Combo Time extenders (The Shining Overlord + Beautiful Nothingness) - The Shining Overlord may seem like an odd choice here, but Berserker's skill does decent enough damage for TSO to be a better 5 slot-in than Crystalian Envoy. We then run Beautiful Nothingness in a 4 slot for some more strength, instead of a crit rate print.
If you have access to Combo Time extenders (Memory of a Friend + To the Extreme!) - This lets Berserker drop The Shining Overlord for Flurry Strength, such as from Memory of a Friend, and the lance affinity will combo with his force strike print for another +5% force strike damage. With this flurry print covering his strength, Beautiful Nothingness is no longer needed, and can be swapped for To the Extreme! for more crit rate.
Sniper's Allure and Chariot Drift are pretty interchangeable for your last slot: Berserker's force strike has built-in broken punisher, and he gets a good amount of crit from his passives (and potentially his prints + co-abilities). You can't really go wrong with either option.
Dragon Piercer - Hunter Sarisse gets the bulk of her damage from fully-charging her special force strike. However, the charging takes long enough to where she can't maintain combo unless she has access to Combo Time extender, such as from Gala Elisanne or Dragonyule Cleo.
Skill Damage isn't important to Sarisse, so we'll drop it. We can then fill out some of our slots with crit rate, force strike, and an affliction punisher.
Your strength print will depend on whether you have Combo Time extenders:
If you don't have Combo Time - use a 70% HP = strength print, such as Crystalian Envoy.
If you do have Combo Time - use a flurry strength print such as Memory of a Friend.
Sniper's Allure and Chariot Drift are pretty interchangeable for your last slot: Sarisse's force strikes can lead to a quick break on a boss, and the water element can access a good amount of crit rate from the 6 weapon. You can't really go wrong with either option.
Doubloons and Doublebuffs - Karina lives for doublebuffs - every buff she receives, no matter what stat it's affecting, will increase the skill damage of her skill 1 by an extra 5%. She can even get a defense buff off of skill 2 to trigger doublebuff effects, and she has natural healing doublebuff.
Brothers in Arms for strength doublebuff is an auto-include. This lets a single defense buff provide 3 buffs: defense, recovery, and strength.
Next up, From Whence He Comes for the buff time. Longer-lasting buffs means a better chance that the buffs will still be active when skill 1 is ready to use.
Dark Side of the Force - The primary source of Linnea's DPS is her force strike, but it takes so long to charge that she can't maintain combo for flurry.
We'll start off with a 5 force strike print, followed by an HP-based strength print, and Levin's Champion for our crit rate.
4 slots take the affliction punisher and Sniper's Allure, as Linnea doesn't have any crit in her base kit, making crit damage questionable.
Kung Fu Combo Master - Lin You is unique among Axes, as her natural access to Attack Rate up and Combo Time lets her easily maintain combo for flurry effects. Therefore, we'll slot in a flurry strength print for our third 5 slot.
Lin You also has access to a monstrous amount of critical rate, getting up to 54% before applying print effects. This makes Chariot Drift with its crit damage an excellent pick for the final 4 slot.
Boss Buster - Mega Man's skills aren't affected by skill damage, so that's out. We'll just go down the priority list after that point, giving him affliction punishing, strength, crit rate, and crit damage.
Mega Man's kit centers around breaking bosses' Overdrive as quickly as possible, though his kit doesn't help him with dealing more damage during Break itself. To help remedy that, we're slotting Sniper's Allure into his last 4 slot.
If you don't think you can keep up combo, then a 70% HP = strength print such as Crystalian Envoy can work in place of Memory of a Friend, and One with the Shadows in place of To the Extreme!.
I Dream of Doublebuffs - Peony is a DPS for the most part, but she also sprinkles a variety of buffs across her team, including defense, strength, attack rate, movement speed, amd shadow res.
Her 5 prints are just standard DPS picks for a Light Wand.
Her 4 prints are where it gets interesting. Slotting in a strength doublebuff print such as Sisters of the Anvil allows Peony to gain a bit more offense out of her defense buff
Our second 4 print has buff time, ideally A Game of Cat and Boar, though From Whence He Comes is good enough. This serves a dual purpose of increasing Peony's buff duration on both herself and her teammates.
If you don't think you can keep up combo, then a 70% HP = strength print such as Crystalian Envoy can work in place of Memory of a Friend.
Chill for 60 seconds, then serve - Pinon's true potential requires first unlocking her Sigil - a 300-second debuff that can be removed faster by spamming level-2-charged force strikes. Pinon will of course want to spam force strikes until that process is done, which takes about 60 seconds. After that, she wants to loop the 6th hit of her standard attack combo string as much as possible.
Skill Damage is not a significant part of Pinon's kit, so we can drop it.
Since we're using just force strikes for a solid minute, we'll want some force strike damage. Some affliction punisher, strength, and crit rate follows, with the last slot being flexible.
If you don't think you can keep up combo, then a 70% HP = strength print such as Crystalian Envoy can work in place of Memory of a Friend.
Vitamin-rich Veggie - Pipple doesn't have any damaging skills - instead, he buffs the team with defense and energy buffs, while his damage comes almost completely from standard attacks.
We can turn this abundance of defense into some offense by running a Strength Doublebuff print, such as Brothers in Arms.
Strength, affliction punisher, and crit rate are all easily filled, leaving us with a 4 slot left. We can then place a buff time print such as From Whence He Comes here, to extend the duration of our strength doublebuffs.
If you don't think you can keep up combo, then a 70% HP = strength print such as Crystalian Envoy can work in place of Memory of a Friend, and Levin's Champion can work in place of The Prince of Dragonyule.
Doublebuffs, Fired Up! - Summer Celliera is a sword, and she does force strike a lot, but she stands to gain more by stacking her natural strength doublebuff effect - she can even defense buff herself to activate it.
To this end, we're dropping force strike in favor of Brothers in Arms for strength doublebuff. We'll also slot in some buff time via From Whence He Comes, to extend our strength buffs' duration.
If you don't think you can keep up combo, then a 70% HP = strength print such as Crystalian Envoy can work in place of Memory of a Friend.
Forceful Family Man - Zhu Bajie is in an interesting predicament. He wants to stay at low HP, but he can't maintain combo for flurry, as he focuses on force strikes instead. This closes off the usual paths for a strength print, and leaves Resilient Offense as his only real option.
Resilient Offense is only on a 5 print (The Synthetic Dragon), so we'll have to give up Kung Fu Masters to fit it in. Dropping Spirit of the Season is out of the question, and we want to keep Summer Paladyns since his skills do a significant amount of damage.
We can make up for losing KFM by putting Kicking Back into a 4 slot - it's close enough at 8% crit, versus KFM's 14%.
Finally, we can't forget the force strike print, which we'll slot in as our second 4 .
Changelog
Changelog[ | ]
This is a list of all notable updates made to this guide. Note that these updates don't always line up with game updates.
If multiple updates happen within the same day, they're batched together into that day's entry in this log. For a full archive of edits, you can view the History button at the top of the article.
Sometimes a couple days of analysis time are needed to judge where new prints can be used. Some new prints may end up not being useful enough, in which case a particular game update might not justify a guide update.
Build updates happen as the meta develops, which also can be off-schedule from actual game updates.
Formatting changes occur based on user feedback and discussion over time.
2.0 Guide Update Changelog
Date
Changes
January 1, 2021
Restructured the Staff Boon focus build to show the buff time options in descending order (previously it was in ascending order).
Renamed the Shadow/Light buffer build, to more accurately reflect its goals. Also added Amaterasu Oblation to its print options.
Split off Overdamage into its own build in the Role-Specific Builds tab.
Due to this, Yukata Cassandra's custom build has been removed, as it is now redundant.
Added The Cutie Competition as an option in the 5* affliction punisher weapon builds.
December 16, 2020
Added a role-specific build focused on Dragon Battles.
Generalized the Staff Boon healer build, so that there's a flex 5* slot. Potential options for the flex slot are discussed in the build description (Castle Cheer Corps, Free-Spirited Opera, etc).
Discussed Overdamage in the Staff Boon healer build, since the setup is very similar (simply choose a strength print for the flex slot).
Added a note to Yukata Cassandra's unit-specific build, saying that Dragonyule Lily uses the exact same build.
December 3, 2020
Added Welcome to the Opera! as an option in the 5* affliction punisher weapon builds.
Added a point to the Skill Prep section that stresses the importance of reaching 100% prep instead of just 50% in a build.
Updated Durant's build to use a Full HP = strength print instead of an HP 70% = strength print, to get in a bit more strength. (Flurry strength is still better than either if combo is maintained, though.)
October 12, 2020
Noted the relevance of the Dragon Form build to onslaught event dragon battles. Also fixed an error in that build regarding Dueling Dancers.
October 10, 2020
Switched most wyrmprint images to show refined vestiges. With the new wyrmprint system, players will see refined vestiges in their inventory far more often than unrefined vestiges in the shop. This is because wyrmprints disappear from the shop once purchased, and almost all wyrmprints will eventually be max unbound for use in lategame play anyway.
In the Getting Started section, points that tell the reader to buy specific prints will still use unrefined vestiges, to make it easier to find the prints in the shop.
Added a Flex Options box for Slayer's Strength and Striker's Strength.
Added extra notes regarding affinities to the Flex Options section.
Updated Gala Zena's build to push strength more so than crit rate and crit damage.
Updated weapon-specific and unit-specific setups to offer alternatives if maintaining flurry is not feasible. However, for units such as Lin You or Yukata Cassandra where high combos are the very basis of the build, those have been left untouched.
October 9, 2020
Initial Version 2.0 guide release. Guide has been completely overhauled for the new wyrmprint system.
1.0 Guide Update Changelog
Date
Changes
September 16, 2020
Added Stellar Show to Delphi's custom build, as an alternative to Mega Friends.
Made slight tweaks to the custom builds for Grace and Hunter Vanessa.
August 23, 2020
Added Memory of a Friend to the Buffers role section, as it is very similar to Jewels of the Sun.
Elaborated on the skill haste prints that offer strength, and how they differ.
Added a bullet point describing Endless Waltz to the Gauge Accelerator archetype.
DHaste from BotWE is user-only in co-op, team-wide in solo, and works when used on Helpers.
Shapeshift Prep works across all allies in both solo and co-op.
Clarified that Unique Transformation units are able to use Dragon Haste and Shapeshift Prep.
Split the "Full HP/Helpers" archetype into "Full HP Damage/Helpers" and "Helper Utility". The latter covers healing and effects such as shapeshift prep, while the former is self-explanatory.
Removed The Bridal Dragon from the general staff builds, as BotWE completely overshadows it (healers have no use for that dragon damage).
July 5, 2020
Removed the build for Gala Elisanne, as it is no longer crucial for High Brunhilda after opening blast nerfs. Additionally, some users expressed confusion between this build and the Buffers section.
Due to the above change, the icon for the Unit-Specific Builds section has been changed from Gala Elisanne to Grace.
Added a mention of Aldred to Natalie's build, as he uses the same prints for the same reasons.
Removed Ramona's build as it is outdated, and her current builds fall into the simple "skill damage + punisher" pattern.
Added a custom build for Summer Celliera.
July 4, 2020
Updated the Axe section to be less negative about Summer Paladyns, as Karina's Mana Spiral has caused it to gain traction in doublebuff teams.
Updated the Dragon Form secondary wyrmprint archetype to include Welcome to the Halidom, and add additional notes regarding which Shapeshift Prep wyrmprint, and who should equip them, as well as elaborate on The Red Impulse and abilities that do not work on adventurers with Unique Transformations.
Added tables to Basic Advice that list Eldwater sell values and Main Campaign Eldwater rewards
July 3, 2020
Added notes clarifying the purpose of Beautiful Nothingness as an earlygame-to-midgame placeholder, to address ongoing confusion.
Added a flexible build to the Bows section, since Resounding Rendition + punisher is used often at endgame while Forest Bonds and Dear Diary fall out of favor.
Added "TL:DR" phrases to several custom builds, to alleviate confusion about which print to pair with what.
Added a build involving Felyne Hospitality to Pipple's build box.
Added a build involving Combo Time and Primal Crisis to Hunter Sarisse's build box.
June 27, 2020
Improved visibility of the "limited" hourglass markers
Updated Mega Man's build to account for co-ability changes.
Updated Natalie's build to include The Plaguebringer, and suggest Dear Diary on a budget.
May 31, 2020
Overhauled the staff build section.
Study Rabbits is now the primary print for healers. Due to HDT opener nerfs, Give Me Your Wounded's Full HP = Defense is no longer necessary, and since healers often over-heal anyway, the Recovery Potency is extraneous. GMYW has therefore lost a lot of value, and is now a secondary consideration at best.
New World Escort has been removed, as there is no longer any place for it - GMYW offers more Recovery Potency if it's needed, while From Whence He Comes offers the 25% prep as well as buff time.
Added Memory of a Friend to the Flurry Strength/Devastation and Skill Haste Archetypes.
May 28, 2020
Removed Gala Prince's build. The HDT opener nerf, combined with co-ability changes, have made his usual HZD build too inconsistent without carefully balancing co-abilities around it. As this guide considers the Wyrmprints alone and does not cover co-abilities, this build is no longer appropriate.
Due to the above change, the icon for the Unit-Specific Builds section has been changed from Gala Prince to Gala Elisanne.
May 19, 2020
Added a contact link to Boblers, who manages and updates the guide.
Clarified the purpose of the Changelog section, and why it doesn't always line up with game updates.
Updated the Basic Advice section
Clarified that this guide is meant for introductory or mid-game. Endgame builds sometimes use factors that this guide doesn't consider.
The section now accounts for the new Role-Specific Builds section.
Expanded the step-by-step "starter pack" section to emphasize print varierty, and include the cost of the pack.
Removed references to "above", "below", or "bottom of the page", due to the shift to a tabber format.
May 17, 2020
Added a "Roles" section to the top of General Builds. The goal with this change is to give better visibility to the "Buffer" role, which many users tend to miss out on. If more common Roles develop over time that would be too repetitive to put in Unit-Specific builds, they would go here.
Moved the Healing Doublebuff section in Secondary Archetypes up a few spots, since it has seen increased relevance with solo runs of endgame content (expert Ciella, expert Kai Yan). Notes on Astral Raids have been removed as those are not really a survival challenge much anymore.
Removed the Buff Time section from Secondary Archetypes, as it is now redundant with the Buffer Role section. The remaining sections have been re-ordered according to their current relevance compared to each other.
Removed the note on the Master High Jupiter strategy with Audric in the Dragon Form section. That tactic isn't used at all anymore.
Added Brothers in Arms to the Strength Doublebuff section, with an explanation of its caveats.
Added The Maid Crusade to the Healing Doublebuff section, with an explanation of its caveats.
Updated the unique build for Durant to consider poison punisher.
May 1, 2020
Since the layout rework allows more space for prints, non-limited substitutes have been re-added to the large icon displays
Updated the unique builds for Delphi, Gluca, Grace, Heinwald, and Hunter Vanessa.
April 27, 2020
Reworked table formatting to be more mobile-friendly.
Moved sections into tabs for faster loading and switching between sections.
Added a section detailing how to get Wyrmprints.
Removed Audric's build, as it is no longer meta with the addition of Revives.
Changed Staff builds to list The Greatest Gift as the sample EXP print, as it is now available at any time.
added an Update Changelog, to make changes more visible to users
March 20, 2020
Removed Halidom Grooms from the Buff Time Archetype. Its only real usage was as a second Buff Time print, however Beach Battle + From Whence He Comes does that job anyway, on top of those prints having more usage (Energy Doublebuff is useless).
March 14, 2020
Updated the Flurry Archetype to mention Combo Time abilities.


 Eldwater?[ | ]


 Delphi
 Durant
 Gala Alex
 Gala Zena
 Grace
Grace
 Heinwald
 Hunter Berserker
 Hunter Sarisse
 Karina
 Linnea
 Lin You
 Mega Man
 Peony
Peony
 Pinon
Pinon
 Pipple
 Summer Celliera
 Zhu Bajie
